

Totally awesome tie-dye
The following is an excerpt from Suzanne McNeill’s book “Totally Awesome Tie-Dye: Fun-To-Make Fabric Dyeing Projects For All Ages”. Follow her techniques to create your own.
Introduction: Tie-Dye is an adventure
At its heart, tie-dye is a simple craft: it’s about adding color to fabric. It’s the range of colors you can use and the myriad of ways to manipulate the fabric that make it so versatile and exciting.
The complicated spirals, circles, bursts, and other shapes made possible by tie-dye come from simple techniques. Fold, twist, pleat, or crumple the fabric, and tie it with very basic materials—a rubber band or string, for example. You can create infinite bold iterations even before adding simple resists and stitching techniques to the mix.
Basic Methods
Every project is different, of course, but they all use the same general process.
Prepare Dyeing Area
The key to a neat, streamlined experience with dye is to set up your workplace ahead of time. Cover the table with plastic and wear a plastic apron. For multi-color projects, make a dyeing pad: Place a piece of plastic wrap on the table, then fold ten paper towels into quarters and place them on the wrap in the same shape as the tied garment.
The paper towels will act as blotters to keep colors from becoming muddy. Have extra folded paper towels ready when you turn the garment over to dye the reverse side. If you are dyeing a project all one color or two colors mixed together, use a shallow plastic tub or bucket. Ready the plastic gloves, and make sure you have a tub of water handy to keep your fingers rinsed.
Bind Your Garment
Launder your garment (without fabric softener) to make sure it’s done any shrinking it will do, and also to make sure it doesn’t have any dirt or extra chemicals on it from manufacturing or packaging.
No need to dry it before getting started. Wetting your garment with plain water before binding will help give it a sharper edge.
Follow the project instructions in this book to bind your garment.
Soak Your Garment
If your dye requires it (see the manufacturer’s instructions), soak your garment in the Soda Ash Fixative Solution.
Mix the Dye
Read the manufacturer’s instructions on your dye for the most effective way to prepare it. You may just need to add cold water to the powdered dye in the applicator bottle and shake.
If you’re using a jar of dye, you may need to paste it up (mash it up with the back of a spoon and a little water) first in another container to dissolve it completely so you don’t end up with “freckles.” If urea is required, dissolve it in a little hot water then add some cold water to make 8 ounces of tepid water. Add this water slowly to the dye powder while mashing it with a spoon to make a paste. Gradually add the rest of the urea water while stirring. Use a funnel to fill squeeze bottles.
Adding a little plain salt to the mixture can help yield darker colors; use 1 teaspoon per 8 ounces of dye mixture.
Add it last, as salt inhibits the dye dissolving.
Apply Dye
Follow instructions for each project. Be sure to apply dye down into folds if you want saturated color or if you’re making a shaped design. If you want more white showing, apply dye on top of the folds only.
Set and Rinse
Remove garment from dyeing pad and wrap it in plastic wrap to keep it damp (or put it in a plastic zip-top bag). Let it set from 4 to 24 hours to allow dye to fix in fibers. Longer setting time produces deeper colors. Rinse under running water until the water runs clear, then remove the bindings and rinse again. Wash immediately according to garment washing instructions to remove any remaining dye. Make sure to wash your newly tie-dyed garments separately for the first few times.
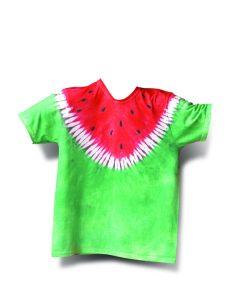
Random Pleats: Watermelon Yoke Variation
Instructions
1. Mark dots about 4” from the collar with fabric pencil.
Draw a line to connect the dots.
2. Pleat the garment on the line and place a rubber band over the line and another about 1” lower.
2. Wrap the area in between the rubber bands with plastic wrap.
3. Dye yoke section red and the rest of the shirt green.
4. After the garment is washed and dried, use black fabric paint and a paintbrush to make “seeds” in the red yoke.
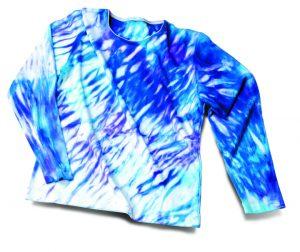
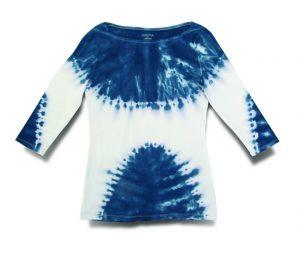
Shibori
Shibori is a tie-dye technique that has been practiced in Japan for hundreds of years, traditionally using indigo dye. Cloth is wrapped, twisted, and folded in unique ways, secured with string, and then dyed. Here we show a very simple, effective Shibori technique.
Materials
• Garment
• Short length of PVC pipe
• Rubber bands
• Applicator bottle(s)
• Dyes
• Plastic wrap
Instructions
1. Wrap the garment smoothly around the pipe.
The area wrapped first will be the lightest.
2. Push the ends to the center.
3. Secure with rubber bands.
4. With an applicator bottle, apply diagonal lines of dye, allowing the colors to mix together.
5. After applying the dye, place your (gloved!) hands around the garment and squeeze to drive the dye down to the lower layers.
6. Wrap the fabric with plastic wrap while it is still on the pipe to keep it damp while it cures.