
DIY Easter Crafts
By Denis Wild
Easter’s a great time to have the whole family involved in making and creating.
Whether you're putting together a scavenger-style Easter egg hunt or creatively decorating Easter eggs, kids and adults alike are sure to enjoy spending time together, getting hands-on, and doing something different.
Here are some simple, inexpensive projects that will inject a me-made quality plus some personalized creativity into your Easter celebrations.
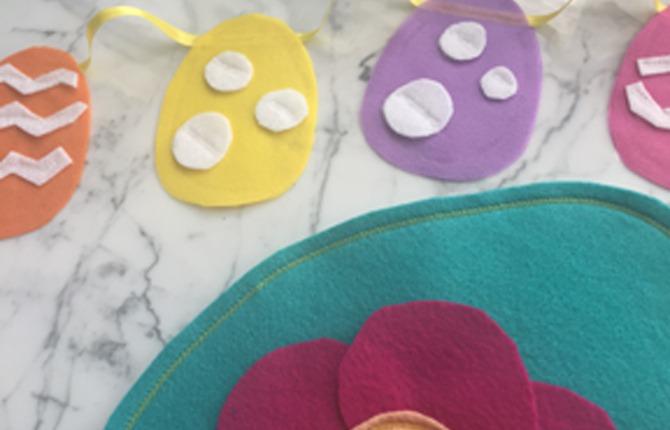
Easter egg bunting
* Cut circles of no-fray fabric into egg shapes of various colours (I used a no-fray craft textile)
* Cut a long piece of yellow ribbon
* Place one fabric egg on top of the ribbon and a matching fabric egg underneath the ribbon to create a double layer of eggs, then use your sewing machine’s zigzag stitch to secure the eggs to the ribbon
* Cut decorative circles and zigzags of white felt
* Secure the white felt pieces to the egg shapes using a zigzag stitch on your sewing machine
Using a sewing machine to hold the craft fabric, ribbon, and felt together will ensure your Easter egg bunting will last for years to come. The Brother NQ900 sewing machine has a lock stitch, which puts three stitches in one spot. When you sew a lock stitch at the beginning and end of your regular sewing stitch, the lock stitch secures the thread ends to prevent them from fraying without the bulk or potential mess of a backstitch.
Fillable felt egg
* Cut two circles of teal felt into two matching egg shapes
* Cut 5 small pink circles of felt
* Cut 1 small peach circle of felt
* Lay the small circles of felt into a flower pattern on top of one teal egg, and sew a zigzag stitch around the peach felt circle
* Cut the other teal egg horizontally about 2/3 up from the bottom so you have two pieces (this cut becomes the slit in the back of the egg that allows you to fill the egg)
* Push the cut teal egg together back into its original shape, then lay the teal egg with the flower overtop, lining up the outer edges
* Sew around the egg using a zigzag stitch, securing (the slit in the back of the egg will remain open and accessible for filling)
Content provided by Denise Wild and Brother Canada. For more information on Denise Wild and DIY project ideas visit www.denisewild.com.